Note: Please download the IPython notebook from this link. Run the code as you read the post
This is a hands on converting a Convolutional Neural Network (CNN) to Fully Convolution Network (FCN). Converting CNN to FCN is nothing but converting fully connected (FC) layers in CNN to convolution layers
Let’s take the standard Caffe Reference ImageNet model CaffeNet and transform it into a fully convolutional net. The code is extracted and modified from the cafee net surgery example
Before converting FC layers to convolution layers, lets see the network architecture first. Figure 1 shows the architecture of CaffeNet.
(Open the image in new tab and zoom to see the details)

Figure 1: CaffeNet architecture
import sys
# Insert path to caffe, change the path accordingly
sys.path.insert(0,"/home/nrupatunga/NThere/Caffe-WS/caffe/python")
import caffe

#Load the original network and extract the fully connected layers' parameters.
net = caffe.Net('../models/bvlc_reference_caffenet/deploy.prototxt',
                '../models/bvlc_reference_caffenet/bvlc_reference_caffenet.caffemodel', caffe.TEST)
print '------------------------------------------------------------------------'
print '-------------------------Network Architecture---------------------------'
print '------------------------------------------------------------------------'
for layername, layerparam in net.params.items():
    print '  Layer Name : {0:>7}, Weight Dims :{1:12} '.format(layername, layerparam[0].data.shape)
print '------------------------------------------------------------------------'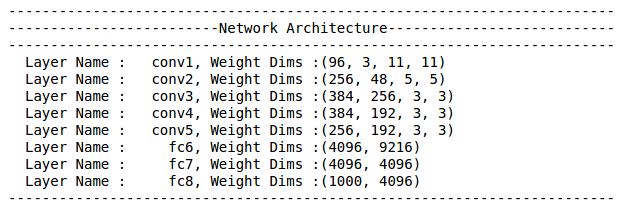
Execute the python code, output prints the layers in CaffeNet and dimensions of weights in each layer. Here for the sake of simplicity I have eliminated bias parameters. As you can see, it has 5 convolution layers (conv1, conv2, conv3, conv4, conv5) and three FC (fc6, fc7, fc8) layers
Lets understand the weight dimensions format in convolution and FC layers. Figure 2 is self explanatory.
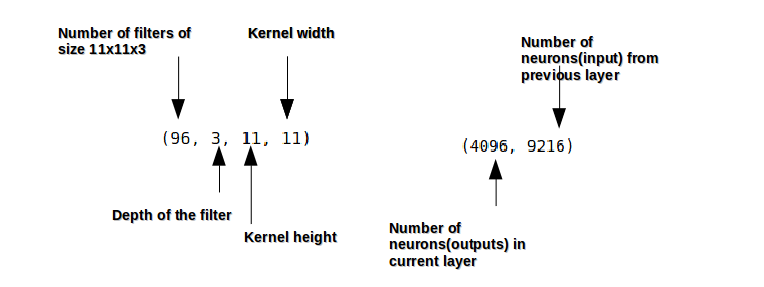
Figure 2: Weight dimensions in Convolution and FC layers
Now that we know the network architecture and the weight dimensions in each layer, our intension is to convert FC (fc6, fc7, fc8) layers to convolution layers
As explained in Figure 2, in dimensions of fc6 layer \((4096, 9216)\), \(9216\) indicates the number of outputs from convolution layer-5 after pooling. Lets just confirm that.
print net.blobs['pool5'].data[0].shape
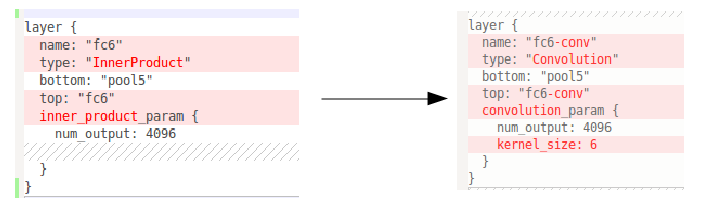
Figure 4: fc6 to convolution layer
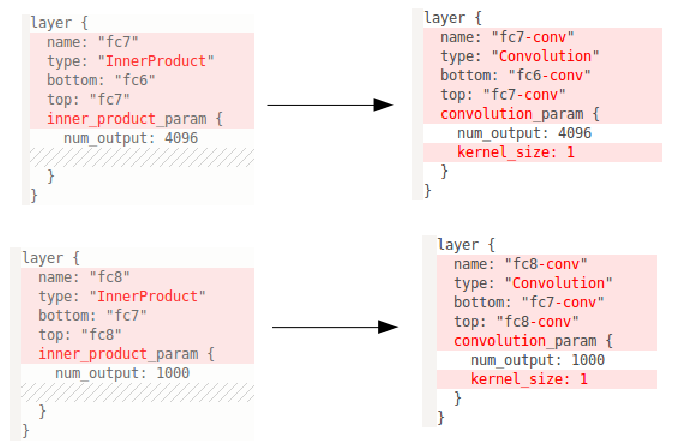
Figure 5: fc7, fc8 to convolution layer
# Load the fully convolutional network to transplant the parameters.
net_full_conv = caffe.Net('net_surgery/bvlc_caffenet_full_conv.prototxt',
                          '../models/bvlc_reference_caffenet/bvlc_reference_caffenet.caffemodel',
                          caffe.TEST)

params_full_conv = ['fc6-conv', 'fc7-conv', 'fc8-conv']
# conv_params = {name: (weights, biases)}
conv_params = {pr: (net_full_conv.params[pr][0].data, net_full_conv.params[pr][1].data) for pr in params_full_conv}

for conv in params_full_conv:
    print '{} weights are {} dimensional'.format(conv, conv_params[conv][0].shape)
Now that we converted the network architecture, lets transfer the weights from CNN to FCN and generate the classification map.
params = ['fc6', 'fc7', 'fc8']
fc_params = {pr: (net.params[pr][0].data, net.params[pr][1].data) for pr in params}
for pr, pr_conv in zip(params, params_full_conv):
    conv_params[pr_conv][0].flat = fc_params[pr][0].flat  # flat unrolls the arrays
    conv_params[pr_conv][1][...] = fc_params[pr][1]
net_full_conv.save('net_surgery/bvlc_caffenet_full_conv.caffemodel')
import numpy as np
import matplotlib.pyplot as plt
%matplotlib inline

# load input and configure preprocessing
im = caffe.io.load_image('images/cat.jpg')
transformer = caffe.io.Transformer({'data': net_full_conv.blobs['data'].data.shape})
transformer.set_mean('data', np.load('../python/caffe/imagenet/ilsvrc_2012_mean.npy').mean(1).mean(1))
transformer.set_transpose('data', (2,0,1))
transformer.set_channel_swap('data', (2,1,0))
transformer.set_raw_scale('data', 255.0)
# make classification map by forward and print prediction indices at each location
out = net_full_conv.forward_all(data=np.asarray([transformer.preprocess('data', im)]))
print out['prob'][0].argmax(axis=0)
# show net input and confidence map (probability of the top prediction at each location)
plt.subplot(1, 2, 1)
plt.imshow(transformer.deprocess('data', net_full_conv.blobs['data'].data[0]))
plt.subplot(1, 2, 2)
plt.imshow(out['prob'][0,281])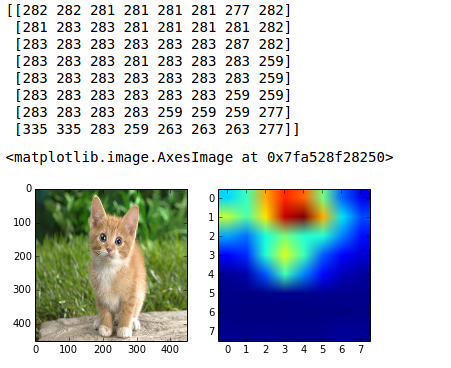
As you can see in the probability map values, the classifications include various cats – 282 = tiger cat, 281 = tabby, 283 = persian.
So FCN can be used to extract dense feature maps. This enables us dense learning (eg. Image Semantic Segmenation).
That is it, we have converted CNN to FCN. It is easy isn’t it?.
 Nrupatunga